|
| Chapter 3 - Devil Gate Drive |
|
| 13/04/1999 |
|
| Loads has been happening, so on with the
pics...
 The
unit here is the speed controller box with the uprated 4QDs fitted. We
found during tests that we had a heating problem, so we have fitted some
aluminium plates against the FET heatsinks and a cooling fan at the open
end of the box to blow cool air over the components. The fan uses very
little power but is quite powerful in the air movement. This unit is now
complete apart from final wiring. The radio control servos (not shown)
have also been completed and tested to satisfaction. This will all be mounted
once we have a clear idea exactly where the weapons will sit. The
unit here is the speed controller box with the uprated 4QDs fitted. We
found during tests that we had a heating problem, so we have fitted some
aluminium plates against the FET heatsinks and a cooling fan at the open
end of the box to blow cool air over the components. The fan uses very
little power but is quite powerful in the air movement. This unit is now
complete apart from final wiring. The radio control servos (not shown)
have also been completed and tested to satisfaction. This will all be mounted
once we have a clear idea exactly where the weapons will sit.
|
|
|
|
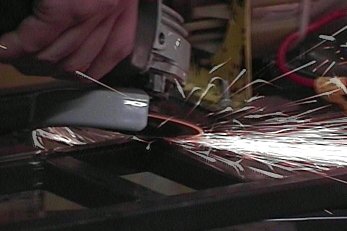 This
is a good action shot of Chris grinding down the welds on the sub-frame.
We have to be able to adjust the positions of the bearing units, so these
welds have to be flat. He also ground some of the other welds to make things
look a bit neater. It has to be said that our welding is not pretty, but
it does the job okay! This
is a good action shot of Chris grinding down the welds on the sub-frame.
We have to be able to adjust the positions of the bearing units, so these
welds have to be flat. He also ground some of the other welds to make things
look a bit neater. It has to be said that our welding is not pretty, but
it does the job okay! |
|
|
|
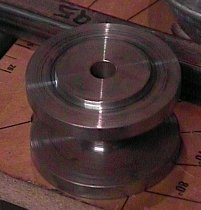 The
piece here is one of a pair made for us by Hartford
Engineering in Cheshire. These will form the connection between the
wheels and the secondary drive sprockets. They were really well made, with
the center bore nicely finished to 15mm to fit the axle snuggly. The lip
on top is designed to fit in the axle hole of the go-kart wheel hubs. The
wheels have been built and inflated and we found we had a puncture in one
of the inner tubes, so it's been out with the rubber solution! The
piece here is one of a pair made for us by Hartford
Engineering in Cheshire. These will form the connection between the
wheels and the secondary drive sprockets. They were really well made, with
the center bore nicely finished to 15mm to fit the axle snuggly. The lip
on top is designed to fit in the axle hole of the go-kart wheel hubs. The
wheels have been built and inflated and we found we had a puncture in one
of the inner tubes, so it's been out with the rubber solution! |
|
|
|
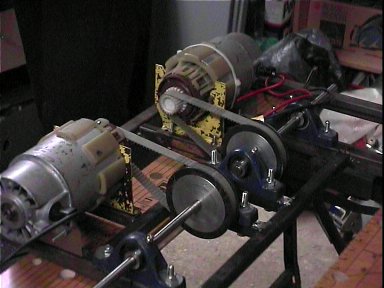 This
is the front sub-frame with the motors fitted and connected to the primary
belt drives. These are larger than last year and then feed on to the secondary
chain drive which powers the wheels. Tensioners are being fitted to the
bearing houses to allow the belts to be well tightened. During the tests
using the old Panda chassis, we found that one of the belts tended to leap
because we hadn't tightened it properly. Some people don't agree with using
belts, but I like them because they are straightforward and work for us. This
is the front sub-frame with the motors fitted and connected to the primary
belt drives. These are larger than last year and then feed on to the secondary
chain drive which powers the wheels. Tensioners are being fitted to the
bearing houses to allow the belts to be well tightened. During the tests
using the old Panda chassis, we found that one of the belts tended to leap
because we hadn't tightened it properly. Some people don't agree with using
belts, but I like them because they are straightforward and work for us.
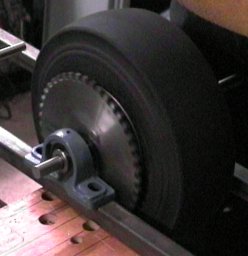 Another
action shot. This is the wheel assembly built and in place. Note the large
drive sprocket on the secondary system. This uses 1/2 inch chain. We will
fit the chain next - it's sat in a box currently. The motor mounts need
to be welded on, plus a thin MDF baseboard and then we will be ready for
some inital chassis runs. Never know, you may even get some video of it!
I know that a lot of the metal may need boring to get the weight down,
but at the moment it's really not too bad at all. Can't wait to get the
thing running now. Another
action shot. This is the wheel assembly built and in place. Note the large
drive sprocket on the secondary system. This uses 1/2 inch chain. We will
fit the chain next - it's sat in a box currently. The motor mounts need
to be welded on, plus a thin MDF baseboard and then we will be ready for
some inital chassis runs. Never know, you may even get some video of it!
I know that a lot of the metal may need boring to get the weight down,
but at the moment it's really not too bad at all. Can't wait to get the
thing running now.
|
|
|
|
|
|
|
|