CNC mill build thread
Moderators: BeligerAnt, petec, administrator
-
Andrew_Hibberd
- Posts: 1134
- Joined: Tue Jan 20, 2004 12:00 am
- Location: London
- Contact:
Re: CNC mill build thread
This is going to be good!
For my stuff:
http://bodgeitandhope.blogspot.co.uk/
http://bodgeitandhope.blogspot.co.uk/
Re: CNC mill build thread
Awesome. Will be interesting.
Re: CNC mill build thread
Will be watching this with interest
I started out with nothing and still have most of it left
-
Andrew_Hibberd
- Posts: 1134
- Joined: Tue Jan 20, 2004 12:00 am
- Location: London
- Contact:
Re: CNC mill build thread
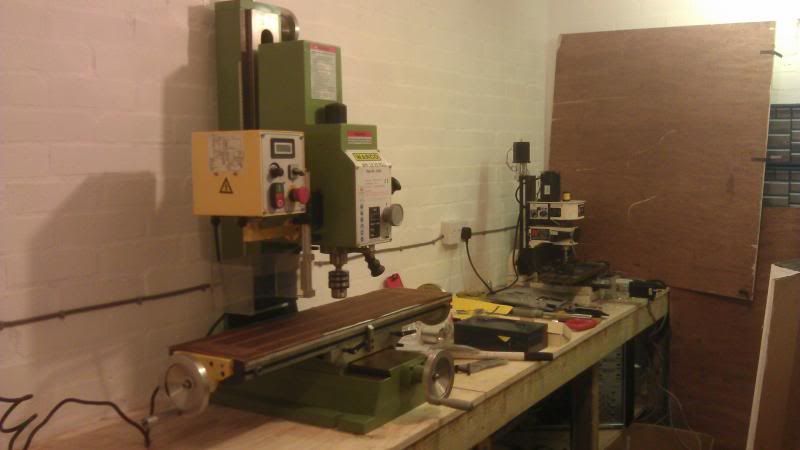
I have been working on this mill until I have some new ideas for robots. It is now up and running although there is a bit to much backlash on the X and Z axis, Y currently has 0.035mm 8)
It took about two weeks to make the parts to mount the ballscrews and bearing blocks (Ebay). I also had to modify the base to have 2 more screws hold in the Y fixed end support and had to drill out the top of the column to hold the motor supports.
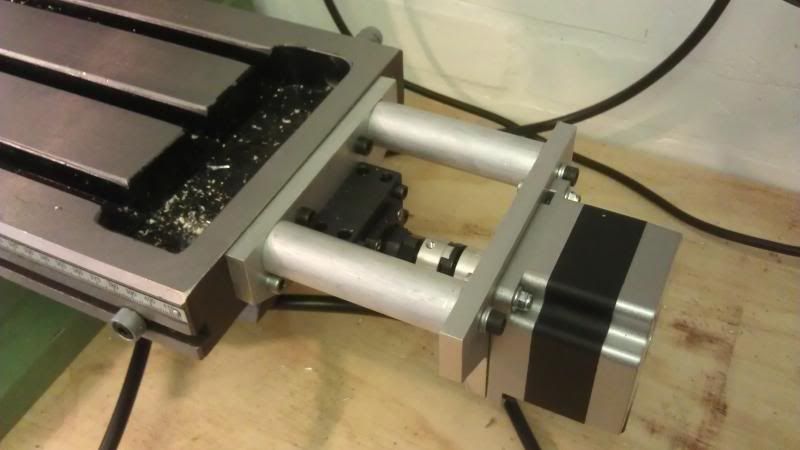
X Axis:
Fixed end support
Floating end support
2 stand offs
Motor Support
Ballnut adaptor
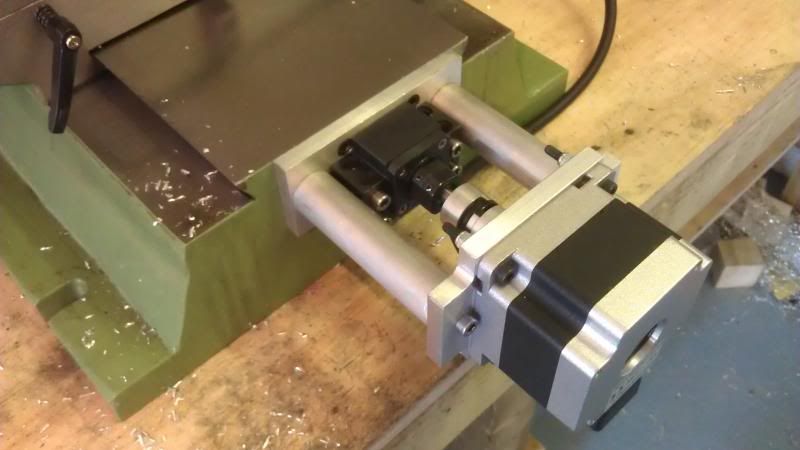
Y Axis:
Fixed end support
2 stand offs
Motor Support
Ballnut adaptor
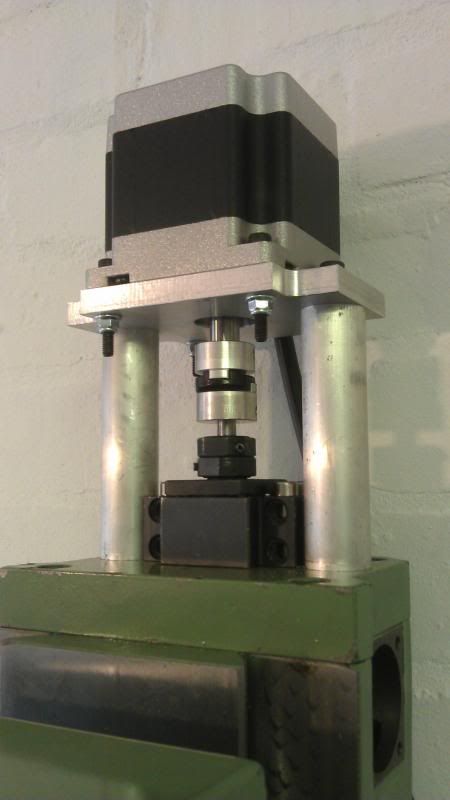
Z Axis
2 stand offs
Motor Support
Ballnut adaptor (although I had to make a thick shim as I measured this wrong)
I mounted the drivers (motioncontrolproducts) and power supply (cnc4you) into the PC I was running on the old mill and put this on a shelf to keep the swarf off.

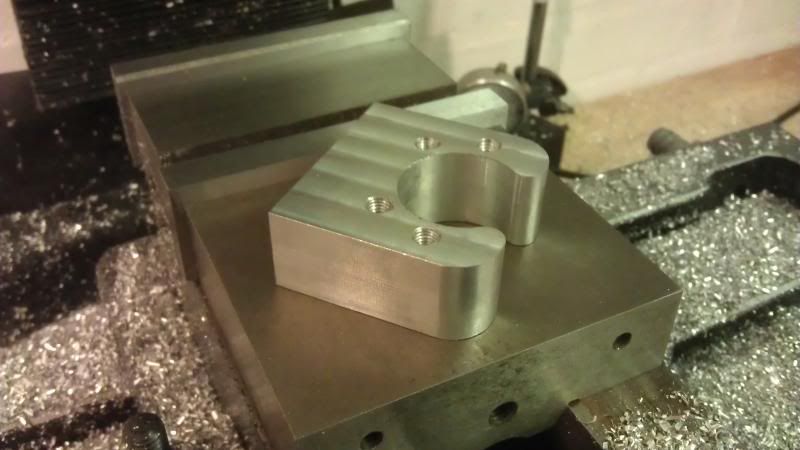
I got the vice today, 4" wide and opens to 4" so billet antweights are possible The problem with the X axis was flex in the ball nut support so I made a new piece out of Aluminium to see how the new machine compares. I was cutting twice the depth, double the spindle speed and almost tripple the feed rate so six times faster to make this part than it would have done on the old one.

Defiantly gets a shiny award
I took a video of it going but its not very interesting to watch. I will have to try some steel over the weekend.
It took about two weeks to make the parts to mount the ballscrews and bearing blocks (Ebay). I also had to modify the base to have 2 more screws hold in the Y fixed end support and had to drill out the top of the column to hold the motor supports.
X Axis:
Fixed end support
Floating end support
2 stand offs
Motor Support
Ballnut adaptor
Y Axis:
Fixed end support
2 stand offs
Motor Support
Ballnut adaptor
Z Axis
2 stand offs
Motor Support
Ballnut adaptor (although I had to make a thick shim as I measured this wrong)
I mounted the drivers (motioncontrolproducts) and power supply (cnc4you) into the PC I was running on the old mill and put this on a shelf to keep the swarf off.
I got the vice today, 4" wide and opens to 4" so billet antweights are possible
Defiantly gets a shiny award
I took a video of it going but its not very interesting to watch. I will have to try some steel over the weekend.
TEAM GEEK!
Re: CNC mill build thread
Ooooh, awesome stuff.
How do you set about converting mills to CNC, like how much stuff ends up being custom made etc? I've got a seig x2 that I'd like to make CNC when I upgrade.
How do you set about converting mills to CNC, like how much stuff ends up being custom made etc? I've got a seig x2 that I'd like to make CNC when I upgrade.
For my stuff:
http://bodgeitandhope.blogspot.co.uk/
http://bodgeitandhope.blogspot.co.uk/
-
Andrew_Hibberd
- Posts: 1134
- Joined: Tue Jan 20, 2004 12:00 am
- Location: London
- Contact:
Re: CNC mill build thread
There is lots of information out there so google will tell you everything you need. I think more people have done X2s than any other machine.
What you need:
Drive motors, these can be either stepper or servo. Steppers are cheaper but also not as accurate.
Motor drivers for the type you buy, need to be able to drive the motor current.
Power supply, typical voltage is proportional to motor inductance. WM18 is running on 48V.
Mounts, I made the ones on my X1 by hand then used that to make the WM18 mounts.
Couplers, various types out there but Oldham have the least backlash.
Bearings, I used a pair of single angular contact bearings for the fixed end of the ball screw mount. These act against each other to reduce backlash.
Optional extra:
Acme screws are fitted as standard, I fitted ball screws to this machine as they have much lower friction but added cost.
I am thinking about tidying up the electronics from the old mill and putting the mill on Ebay, just need to find a suitable box for it all.
TEAM GEEK!